Categories
Ambience Gamedev Grievances

Gamedev Grievances #37: Flying Over Oceans

With another hectic year of study over and exams done, I’ve finally finished my undergraduate studies in engineering! Which means I’ve also finally got back into the groove of gamedev and have been putting some of the finishing touches on Ambience. (Don’t worry, I definitely haven’t given up on Ambience at all! I’ve just been a lot quieter than usual internet-wise, which I know needs to change – I’m thinking about ways of improving that.)

In redesigning yet another cutscene, I stumbled upon a cool application of numerical methods which I thought I’d share. (For those who aren’t familiar with the term, numerical methods are a way of finding approximate solutions to complex equations which would be really hard to solve exactly.) In my case, I wanted to make a cutscene where the player is viewing a fireball travelling over water, from the perspective of the fireball.

Here, I needed an effect with a water background moving vertically down the screen to represent the water below the fireball. I already had a 32×32 water tile – check. But these water tiles needed to stretch vertically and move faster as they moved towards the bottom of the screen (“closer” to the player). So I made some horizontal “strips” of water tiles and tried scaling them and moving them down the screen. But then I realized something else: the strips of water tiles had to scale and move while also remaining attached to the strips of tiles above and below!

To achieve this, I made a data structure containing a list of y-positions on the screen. These positions would move progressively down the screen, going faster and faster as they went. When the bottom-most position went off the bottom of the screen, it would be placed back at the top. I could then draw each horizontal strip of tiles stretched vertically between two of these vertical points, and it would always remain attached to the strips above and below it. The diagram below shows how this all looks in practice:

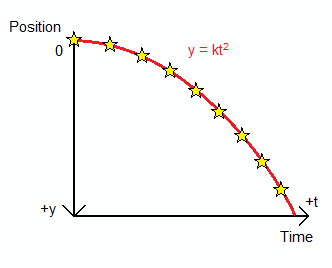
That only left the vertical movement itself. On every frame in-game (once every 1/60 of a second), each point had to move down the screen a bit. If a point was closer to the starting point (the “horizon”), it had to move only a small distance; if it was closer to the bottom of the screen, it had to move a larger distance. So as time progressed, each point would be falling faster and faster. I chose to model this using a parabolic relationship between position (y) and time (t), like in the graph below, which is similar to how things fall under gravity.

Relationship between position (y) and time (t). The stars show the y-value points, and k is just a constant. I’ve drawn the y-axis with larger values downward, since this is how it works in-game.

But there was a problem: since I was working with multiple points, I couldn’t simply use an ever-increasing time variable to work out the position of each point every step. Instead, I had to calculate the next y-position of each point (y_{2}) based only on the current y-position (y_{1}) and the difference in time between each frame (Delta t, which in this case was 1/60 s).

Warning: Heavy Maths Ahead!

It turns out I couldn’t do this easily by playing with the exact equation for the parabola, either:

y_{1} = k t_{1}^{2}, y_{2} = k t_{2}^{2}

y_{2}-y_{1} = k left( t_{2}^{2}-t_{1}^{2} right)

y_{2}-y_{1} = k left( t_{2}+t_{1} right) left( t_{2}-t_{1} right)

y_{2}-y_{1} = k left( t_{2}+t_{1} right) times Delta t = ????

This is where the numerical methods come in! I approximated the change in y using the derivative (“slope”) of the parabola at the current value of y, like this:

y_{2}-y_{1} approx left. frac{dy}{dt} right| _{left(t_{1},y_{1} right)} Delta t

y_{2}-y_{1} approx 2kt_{1} Delta t

Then I rearranged the original formula for the parabola to get rid of that pesky, unknown time variable t_{1} :

y_{2}-y_{1} approx 2k sqrt{frac{y_{1}}{k}} Delta t

y_{2}-y_{1} approx 2 sqrt{ky_{1}} Delta t

So at every step, I updated the y-position of each point simply by adding 2 sqrt{ky_{1}} Delta t to it. (With one exception: for points at the starting point, the slope of the parabola was zero so the point wouldn’t move down at all! Instead I used the exact formula for the parabola to shift the points nicely off the starting line.)

Here’s a GIF of the numerical method in action (the points are shown as red circles):

Hey, nice! The red circles drop from the starting point and accelerate as they move downwards, as expected. And here’s what it looked like when I added the horizontal strips of water background between the points (with some other minor adjustments):

I then made some more adjustments including changing the speed and number of points and fixing that annoying “bobbing” top of the water level. And here’s the final(-ish) result:

(I guess learning all that maths in my engineering degree did come in handy, after all!)

Categories
Ambience Gamedev Grievances

Gamedev Grievances #36: More Pixel Art By A Non-Pixel Artist!

So with another semester of uni over, I’ve finally had some more time to work on Ambience and start applying some of the finishing touches. One of those “touches” is revamping the characters’ mugshots, which I originally made over a year and a half ago (wow, how time flies!) and posted on here.

Since then, though, I’ve realised that the mugshots are okay, but still could be better. Since I’ve had a bit more practice at pixel art in the past 18 months, I decided to redo them once and for all. But this time there’s an added twist: instead of depending too much on copying and pasting features, I decided to draw each character’s mugshot independently and from scratch.

Here’s how they turned out:

The Player

As you can see, I’ve gone for a slightly different, almost “anime”-like style with these new mugshots, and I’ve also made them bigger so that I can draw out more detail in the characters’ faces. The player’s mugshot was an important one, since the player sees it all the time in-game, so it had to look pretty good. Most of the original features and colours remained the same with this one, including the player’s spiky bed-hair. The hair was shaded a little differently to the original and uses highlights a little more carefully.


Vulcan

Again, Vulcan’s mugshot uses the same colours as his original mugshot. The open, smiling mouth was very tricky to pull off, and even now I’m not totally happy with it… (Closed mouths are so much easier to draw!) On the plus side, I think Vulcan’s hair turned out fairly well and nicely reflects his headstrong, fiery personality.

Zephyr

Speaking of hair… Zephyr’s hair was daunting to begin with, but it was actually easier than I thought it would be. I realised that I didn’t have to go into huge detail to bring out the bushy, woolen texture – a few wavy highlights here and there were enough. I also drew Zephyr’s eyes a little differently, not just to make them more feminine but also to give her that permanent, slightly annoyed expression.

Pontus

I actually liked the “furry” texture of Pontus’ hair and beard in his original mugshot (and NPC sprite), so I replicated that here. (In fact, I coloured in Pontus’ beard by picking a 4-colour palette and just scribbling over the beard with each colour in turn until it looked good!) I also made his eyes smaller and his nose bigger compared to other characters to make him seem a bit beefier and less friendly.

Clarissa

Ooh boy, this one was tough. Clarissa’s mugshot has so many unique elements: her eyes, her hair, her lipstick… Making expressions out of that lipsticked mouth was pretty difficult, but I managed to get some inspiration from the original mugshot. I also replicated her dry, slightly frizzy hair texture from the original mugshot, and gave her some eyeliner as well to complete her unique look (even though, well, Clarissa’s not exactly the sort of person who would wear eyeliner to work).

Thanks to her trademark fringe, Clarissa’s face is quite asymmetrical and this meant that I had to pixel in each eye as completely separate features. In the original mugshot, I made the hair over her covered eye partly transparent so you could see the eye underneath, but this time I just made the eye outline a little lighter and kept both her irises the same colour. It gives pretty much the same effect but requires a smaller colour palette, which is easier to work with. After all that work, I think her mugshot turned out pretty well!

I’ve still got to complete mugshots for some minor characters (particularly Foss’ Henchmen), but it still feels like I’ve reached a milestone, and I’m much happier with how the mugshots look in-game.

Categories
Ambience Gamedev Grievances

Gamedev Grievances #35: Generating Items

In my recent escapades with developing Ambience, I’ve spent several days (!!) adding over 50 new weapons to the game, each with its own strengths and weaknesses (and quirks). It’s been a big job, but now I get to reap the rewards and finally add them to the game.

Except… how do those items get generated in-game, anyway?

This was yet another system that I had implemented very early on and had all but forgotten about. So I decided to crack open my rusty old system to see if I could improve the way items were generated.

The Original System

When a dungeon is generated in Ambience, all the possible items for that dungeon are loaded into a grid data structure, along with their respective probabilities of appearance and the dungeon floors they should appear on. Then, an “evaluation” script looks at the grid and spits out the ID number of the item to be generated. This general idea remained unchanged, but what I did change was the way the evaluation system worked.

The original script used a long and rather dodgy iterative method. It would scroll through each item in the grid, and for each it would generate a random number from 0 to 1000 and compare this with the set probability of that item appearing. If the random number was less than the probability, that item was selected and the loop was terminated. Of course, this system had the potential to go on indefinitely without ever selecting an item, so a maximum number of trials (something like 2,000) was set to prevent this.

Even so, having to generate a random number for every item checked, as well as having to loop through the grid multiple times to find an item at all, made this system rather inefficient. In addition, if the probabilities of items was less than (or more than) 1000, some items would appear more or less often than specified. In other words, the system was just plain dodgy. So, off to work I went…

A Better Method

Getting rid of the iterations was top priority right from the start. I wanted to build a system that required the least computation time – that meant generating a single random number and scrolling through the data structure only once, while making sure that a valid item was produced every time. Here’s the solution I came up with:

  • The first thing I did was sum all the probabilities to give a basis against which I could compare the relative probabilities of each item. (Much better than having to manually make sure that all the probability values added up to 1000!)
  • I then selected a random number between zero and the probability total. That random number corresponded to the item I was going to choose.
  • To find that item, I went through each item in the grid in turn. Each item’s probability was added to a cumulative sum variable keeping track of the cumulative sum of probability values. Then, I checked: was the cumulative sum, including the latest item, bigger than the random number I chose? If so, then the latest item was the one to generate.

Here’s a diagram which probably explains everything a lot more easily than the wall of text above:

But wait! What about items on different floors?

Ohhhh, that’s right… we also have to check if the item we’re making can actually appear on that floor before generating it!

There are two ways I found to approach this. One was to choose a random number at the start, then go through the grid and check if the chosen item can be made on that floor before “approving” it. If that item can’t be generated on this floor (an “invalid item”, so to speak), choose another random item from those remaining and keep going.

Even though this method only needed to go through the grid once, the contribution of these “invalid items” to the sum of probability values was problematic. Since new items were only chosen from the list of remaining possibilities, this meant that items earlier on in the list were more likely to be skipped over in the end result – thus skewing the true probabilities. Even worse, the final item in the list could itself be an invalid item for that floor, which when chosen would result in no valid item being generated!

In the alternative method, which I ended up using, the script skimmed through the grid once at the very start to find any invalid items and set their probability values to zero – thus effectively removing them from the grid. Only then did the script choose a random number and go through the grid a second time to find the corresponding item. Although this meant that the grid had to be checked twice, it guaranteed that all items and probability values were valid every time. In any case, this was much better than checking the grid indefinitely in an iterative method!

Here’s another nice diagram summarizing the above:

The Learning Curve

For me, the biggest takeaway from this was to make systems simple, but not too simple. It’s nice to have a clean, functional item generation system that doesn’t rely on iteration – but at the same time, my original aim to “go through the grid only once” turned out to create more problems than it solved. The final script, while perhaps not as efficient as I had originally hoped, was still good enough to get the job done.

Categories
Ambience Gamedev Grievances

Gamedev Grievances #34: Taking Up Arms… Literally

A long-standing “feature” of Ambience has been the somewhat embarrassing fact that, well… none of the characters seem to have arms.

Some armless action from an earlier build of Ambience.

This was primarily because I’ve never been great at pixel art, so approaching this from a purely artistic perspective would have made for a very big and very painful job. First, I’d have to making sprites for every character walking and attacking in eight directions – arms included. Then I’d have to give the player the ability to hold and swing weapons. The thought of making a set of animated sprites for every weapon in the game was terrifying, to say the least.

Mathematically, however, this isn’t too difficult to pull off. I’d already used some clever maths to animate a hand swinging a weapon, as well as a generic creature attack. But I hadn’t yet done the same for a complete arm – mostly due to laziness.

But evenrually, I decided that enough was enough. I was tired of trying to convince myself of the normality of inexplicable floating hands. So I rolled up my sleeves and got to work making some arms for my characters.

Arms for Programmers

I designed my characters’ arms to be relatively simple. They consisted of two “nodes”, a shoulder and a hand – basically two points which the arm had to go through. My “floating hands” engine already gave me the framework for the hand node – how it moved when rotating or swinging a weapon, and so on – so I duplicated this for the shoulder node and tweaked it slightly.

Now each character had its own four nodes – two shoulder nodes and two hand nodes which moved with each character. So far, so good.

Then came the tricky part. I made up some quick generic arm sprites which were about the right length and shape, and – using a lot of trial and error – worked out how to rotate each arm sprite to always pass through the hand and shoulder nodes. The system I ended up with used the shoulder node as an immobile “pivot”, and rotated the arm sprite so that it always pointed from shoulder to hand.

It sounds simple (and it is, actually), but it was a bit tricky to implement in practice. One of the difficulties I faced was trying to get rid of unsightly, “sticking-out” pixels caused by very slight rotation of the arms in the resting position. (Rather than try and fix this using code, I ended up modifying the arm sprites slightly so slight rotation wouldn’t cause those sticking-out pixels.)

Note that sticking-out pixel on the player’s left arm.

While testing things out, I placed the player in a test room and moved his arms around in almost every imaginable way, just to check that everything looked okay. Which it did, in the end:

I’ve highlighted the hand and shoulder nodes in this one so you can see how this system works.

Considering that this was all done using code rather than actual sprites, I was fairly happy with the end result. Of course, I could have made it look much better by making some actual sprites for each arm, but as I mentioned before, that was a bit beyond my abilities. At least it’s better than having to put up with floating hands!

Categories
Ambience Gamedev Grievances

Gamedev Grievances #33: Pain with Primitives

A long time ago, on a computer far far away… there once was a development build of Ambience which introduced a neat swirling light pattern in the prison-based dungeons.

Throwback to the good old days… September 2016, to be exact. Wow, this really is old.

More recently, I decided that the light swirl was in need of some updating. It hadn’t actually changed much since the GIF above (except I might have changed the colour a bit – I’m not exactly sure). In particular, I didn’t like seeing the sharp edges of the light swirl and decided to make a smoother fade effect at the edges. How to do this, you ask?

Enter the primitives…

I’ve never liked primitives much. Not because they’re actually not useful – they really are – but mostly because I’ve always seen them as more of a 3D thing rather than a 2D thing. It’s kinda like that obnoxious relative you always hear about at family gatherings but never really meet, and when the time comes to meet them, you’re not super keen on it. If that makes sense…

Anyway, here’s my own simplistic understanding. A primitive is kinda like a basic shape (say a point, line, polygon, 3D blob…) which you define by setting the vertices/corners and letting the game engine draw it. Say you want to draw, I dunno, a triangle. No problem! Just set three vertex positions and tell the game to fill it in. How about a segment (like a pie slice) for our swirling light? Also easy-peasy! Just draw a bunch of really thin triangles squashed up next to each other, and if they’re thin enough, no-one will notice that your pie slice is actually kinda blocky at the ends.

Fading the edges

In the GIF above, I just made a single segment primitive, drew it and rotated it around and around to make the swirling light effect. But to fade out the edges, I couldn’t just rely on a single primitive. Instead, I needed to add some more primitives (think: thin pie slices) with gradually increasing opacities at the edges to surround the bright “main” segment.

My first thought was, “Why don’t I make twenty separate primitives for the segment and just fade out the ones at the ends?” But I figured that would be inefficient. I only needed separate primitives for the edges where the opacity was changing, not for the middle segment which had constant opacity. So, I had a plan: First draw the primitives at the leading edge fading in, then a single primitive for the middle segment, and then finally some primitives on the trailing edge fading out. Easy, right?

Well… sort of. There’s a price to pay for efficiency, it turns out. I wanted to make my light swirl code as elegant and efficient as possible, so I thought up a basic algorithm to do the job using a single for-loop and minimal different cases:

  • Set the initial opacity to zero.
  • Check where we are on the light swirl segment. If we’re near the leading edge, increase the opacity a bit. If we’re near the trailing edge, decrease it a bit. If we’re in the middle, don’t do anything.
  • Check if the opacity’s changed. If it hasn’t, then fine – just add another vertex to the same primitive (this keeps drawing the middle segment as a single primitive).
  • If the opacity has changed, then we stop drawing the primitive we were drawing and start drawing a new one with a different opacity.
  • If the opacity’s about to go below zero, then don’t draw any more primitives. We’re done! (The limits of the for-loop take care of this for us.)

The outtakes…

Because stuff always messes up when you’re doing these things.

The first form of the algorithm I tried drew the light swirl perfectly – with the exception of a single segment just before the trailing edge, which it refused to draw at all. You can see this pretty clearly in the screenie below:

Note that the light swirl (centered on the player here for debugging purposes) is rotating counter-clockwise – so the “leading edge” here is below the player and the “trailing edge” is to the player’s left.

Even when I changed the number of segments, the angle of each segment, and the number of fade in/out segments, the same thing happened. The segment two positions before the start of the fading-out segments simply refused to be drawn.

Since I had set the peak opacity to be 1 (that is, the middle segment was completely opaque), I couldn’t really see clearly what was going on. So I halved the peak opacity and had another look at the leading and trailing segments.

Aha! So while the leading edge segments are drawn normally, the two visible trailing edge segments are drawn with these weird gradients! Something was going on with the trailing edge segments overall. I’m not sure exactly what it was in the end, but eventually I gave up trying to salvage my code and just re-wrote it following the algorithm above. And it worked!

In this case, the arc draws out a 120-degree segment with 12 segments (making it nice and blocky), including 1 leading-edge and 1 trailing-edge segment.

Finally, I made the light swirl sit at a random corner of the view and draw the arc from there, so that the arc would “flash” periodically across the player’s field of view, as per the GIF at the top. (I also made the colour a bit “redder” compared to the top GIF.)

This is how it turned out in the end with 30 segments. It looks a tad choppy here (you can see the individual segments kinda clearly), but that’s just the GIF recording software – it’s much smoother in-game when running at 60 fps. I could make it draw more segments for an even smoother fade, but figured it probably wasn’t worth it.

Looks good!

The Learning Curve

There’s always lessons to be learned from solving these kinds of problems, so here they are:

  • As I mentioned above, in-game efficiency comes at a cost – which is usually time spent actually implementing the system (and tearing your hair out trying to squash those bugs). Generally, I’ve found that the more sophisticated and/or efficient your algorithm is, the longer it takes to make it work. But when it does work, it’s worth it.
  • This might be a no-brainer to some, but I find it helpful to break systems down into simpler ones that are easier to deal with when trying to identify and fix problems. In this case, it would have been really hard to fix the problems I had, if I had kept the swirling light flashing at full speed in the corner of the room. Instead, I made the light smaller, rotated it slower, centered it on the player, made it blocky by changing the number of segments, and adjusted the peak opacity and total angle swept out as needed until I (finally) solved the problem. Whatever it takes, I guess.
Categories
Ambience Gamedev Grievances

Gamedev Grievances #32: Too Many Particles

So, uni’s gone back for another semester, which means once again it’s time to hit the books. I’ll still post here as often as I can (even if only once a fortnight), even though progress is going to be a bit slower for now. That being said, though, I’m still very happy with the amount of progress I’ve made towards finishing Ambience over the past month!

Anyway… recently I’ve been preparing for people to play-test Ambience again (which is always easier when uni’s in session, for various reasons). That’s meant I’ve gone back and revised the game intro and the first few dungeons (including finally making some proper sprites for the scientist Foss!), just to make sure everything’s working okay and looking good.

However, as always, things don’t always go to plan. One example was with the intro cutscene, which I completely revamped – and where I also found that the particle weather effects were taking a very, very long time to switch from one to the other.

In Ambience, weather effects and the smooth transitions between them are handled by a “weather controller” object. You can see a few of the important parameters associated with that object as red numbers in the GIF above. Basically, when switching between Ambiences, the object waits until there are no remaining particles from the previous Ambience before it starts creating particles (and other things) for the new Ambience.

The most important parameter here is the bottom right number, which is the number of particles in the room. That number has to go to zero before the Ambience changes – which, as you can see, seemed to take an unusually long time. But why?

Debugging

To work out what was going on, I changed the Ambience of Dust particles to have a shorter lifespan – meaning that each particle would disappear sooner, while it was still on the screen. That way I could see what happened when the particle disappeared. I found this:

As it turns out, the weather controller object stores two types of particles: one which is created initially (the dust particle), and another which can be created on the first particle’s “death” (or disappearance). Sometimes the death particle is needed, for example for the splashing raindrop effect in the Ambience of Rain. Other times it’s not required, and the death particle takes on a set of “default” properties and, in theory, isn’t used.

But the weather controller object decided to create the death particles anyway, even if they weren’t needed or properly defined! (These are the little white dots you see in the GIF above.) These death particles had their own lifetime, which prevented the change in Ambience from occurring until all these useless death particles had disappeared. Not only that, but the extra particles put a larger load on the processor that it really didn’t need to.

The Solution

The solution was simple: I just told the controller object not to create any “death” particles if they weren’t needed. The result:

Notice how the number of particles here (28) is much less than the number present in the previous case (226) – yay for optimization!

Finally, I re-extended the dust particle lifetimes so they reached the opposite side of the window before disappearing, and the job was done!

The Learning Curve

The major take-away from this was something I already knew: adding new features sometimes means other features need to be revised. In this case, adding the “death particles” for the raindrop effect – something I did several weeks back, I think – broke the effects for the other Ambiences, all without my knowledge. It was only when I went back and re-did the intro cutscene, which I hadn’t even looked at in a long time, that the bug came to light.

Of course, this sort of thing happens in gamedev quite a lot – but it’s still a good reminder to be on the lookout for new and unexpected effects when you’re adding or changing features.

Categories
Ambience Gamedev Grievances

Gamedev Grievances #31: When Allies Get Distracted…

Consider this fairly typical scenario in a fairly typical dungeon crawler: You and an ally spawn in a room with a couple of enemies standing nearby.

You choose to wait it out for a turn. The enemies move closer. So far, so good.

The next turn, you choose to attack an adjacent enemy. The enemies fight back. Damage is dealt. But… but your trusted ally is still standing next to you, staring into blank space, without having dealt a single point of damage!

Such was the very atypical scenario I was faced with in the past week, which took me a good few hours to work out – and the solution left me pretty much shaking my head in disbelief.

Let’s break down what went wrong and how I was able to fix it:

Firstly, Pontus (the guy with the orange beard) is holding a weapon with a two-tile range. This means that he can hit any enemy standing above/below him, to the left or right, or diagonally at a range of two square tiles in all directions. It’s important to note that he can’t just hit any enemy standing two tiles distant – there are actually a handful of “dead zones” which he can’t hit, as shown in the graphic below.

Secondly, the “find an enemy to attack” script cut a very important corner it shouldn’t have. This script, as I originally wrote it, completely ignored the dead zones and just said “yeah, any enemy standing in that two-tile range will do”. Specifically, I used a couple of data structure functions which picked out the grid coordinates of the “first” enemy in that grid region – a bad idea in hindsight. Here it just so happened that there were two enemies in the region, and Pontus decided to try and attack, well, the one he couldn’t actually reach.

Once I worked that out, the solution was pretty obvious: check only the tiles that Pontus could reach! I used a simple “for” loop here which starts at Pontus’ current direction and sweeps around until it finds a “reach-able” enemy in the red cells. Once such an enemy is found, the game quickly checks if Pontus can actually hit it – in other words, it’s not blocked by a wall tile or anything – and then if that passes, Pontus gets the go-ahead for an attack.

The learning curve:

There’s one thing I got out of working through this problem, and that is that sometimes, a simpler approach isn’t the best one. I actually made a huge oversimplification in checking only for a single enemy in a single, large square region, rather than taking the blue “dead zone” cells into account.

That being said, though, when I originally wrote the offending script, the whole idea of “dead zones” never actually crossed my mind. So in a way, it’s understandable that this came back to bite me later on in the gamedev process.

Categories
Ambience Gamedev Grievances

Gamedev Grievances #30: When Corridors Get Edgy

You know you’re a truly hardened indie game developer when you spend three hours trying to figure out how to stop your roguelite from generating corridors along the edges of rooms – and are hardly surprised it took you that long.

Here’s the deal…

The dungeon generation scripts for Ambience have gone pretty much untouched since I first wrote them nearly a year and a half ago (scary, I know). The general strategy is:

  1. Choose a few centre locations for rooms.
  2. Blow up some rooms at those points.
  3. Connect all the room centres with corridors going vertically, then horizontally from A to B. Simple, but effective.

Except… sometimes the game would try and connect two rooms with a corridor which would run along the edge of another room. This doesn’t sound like much of a problem, and when the player’s standing in the middle of a room, it isn’t.

Version 1. So far, everything looks good…

But, when the player moves to the edge of the room…

Did I say everything looks good? Yeah, scratch that.

“Ahhh! What happened?! Why can’t I see? Why is everything so DARK????”
— The player (probably)

In all seriousness, though, finding yourself suddenly wading through fog in the middle of a large room is more than a bit off-putting. To try and fix this, I experimented a bit with the line of sight algorithms and tried to get the game to fix the problem after the corridors had been dug out, with little success.

So I dusted off the corridor generation script. This script was actually surprisingly simple to begin with: where there’s a wall (or water) tile, dig out a corridor – first vertically, then horizontally.

Version 1 of the passage creation code (vertical corridor part; the horizontal corridor part follows and is analogous).

While this was simple, it wasn’t very smart. It couldn’t tell what it was digging next to – sort of like a prison escapee trying to dig a tunnel to freedom, only to end up going around in circles. So I rolled up my sleeves and got to work answering the question: How do I tell this script not to dig out corridors next to pre-existing rooms?

Checking perpendicular directions

The initial solution seemed easy enough: check the tiles perpendicular to the direction of “digging”. If one or both of these adjacent tiles is a room tile, don’t dig out a new corridor tile, but move on to check the next tile instead.

Version 2 code.

This turned out – well, okayyyy, I guess

Version 2 result.

The script still didn’t know not to dig out corridor tiles at the corners of rooms – hence the isolated corner tiles at the bottom-left and bottom-right. The script also didn’t know not to dig out tiles at the “turning point” of the digging operation, when the direction switched from vertical to horizontal – hence the single-tile bite out of the wall at the bottom.

(You can trace out the original path of the corridor fairly easily on the minimap. Notice how the corridor comes down from the top-left, hits the bottom-left corner, and goes out the bottom-right of the room.)

I fixed the latter problem first, by checking whether there were any adjacent corridor tiles when the digging “turning point” was reached.

Version 3 code.

The result:

Version 3 result.

Hey, nice! We got rid of the isolated single corner tile and the bites out of the room edges all in one go!

The only thing that still bugged me (no pun intended) was the corridors terminating at the corners of the room. While this was passable, it made the dungeon layout a bit too labyrinth-like and not very easy to traverse. So I decided to extend the corner-corridors by a single tile to connect properly with the room.

Making connections

In my first attempt at making the room connections, I checked for no room tiles adjacent to the previous cell that had been dug out (or checked), to determine whether the current cell should be dug out as a corridor tile.

Version 4 code.

This didn’t work out quite as I had hoped, as you can see:

Version 4 result.

Yep, this is the same room as before, believe it or not! The main problem here was that the script refused to dig out the entrances to corridors along the flat faces of the room. This actually made the extended corner connections the only connections between rooms, which was perhaps a little drastic. (Yeah, just a little.)

In my next attempt (round 5), I rearranged the logic a bit and went back to checking the tiles adjacent to the current tile. But I also let it dig out a corridor if the previous tile had exactly one room tile next to it in any direction, including diagonal directions. This would (hopefully) extend the corner corridors as well as dig out the flat-wall entrances.

Version 5 code.
Version 5 result.

The result here was striking: while the upper-left corridor tile had been dug out (and the upper-right one too!), the bottom-right corridor remained stubbornly closed off. (Oh, and the script took another bite out of the wall at the bottom, too. Perhaps it was hungry.)

This was the “a-ha!” moment when I remembered that the corridors were only being dug out in a single direction. In this case, the wall-edge corridor was being dug out from top-left to bottom-left to bottom-right, in that order (remember?) But the script was only checking the current and previous tiles, and not the next tile, to work out if it should dig out the current tile as a corridor (remember that too?)

In short, this meant that the script would always dig out the corner when entering a room, but never when leaving the room.

Looking Both Ways

So for my next trick – er, I mean revision of the script, I made the script look both forwards and backwards to decide whether to dig out a corridor tile. This would ensure that all corner corridors would be dug out successfully.

Version 6 code.
Version 6 result.

Looks much better! The only thing left to do was to get rid of the little “bite” of corridor tiles at the bottom-left corner, and my work was finally done!

The final version of the code.
The final result! (The overall floor layout looks pretty neat as well!)

The Learning Curve

Three hours is a long time to spend on a single problem – certainly long enough to give it the infamous title of “gamedev grievance”. So what did I learn from this ordeal?

  1. Find a systematic way of solving problems. At first I wasted a lot of time “guessing and checking” numbers of adjacent tiles, but when I stepped back and thought about the problem logically and systematically, I found a solution more quickly – and I could explain how and why it worked, making debugging much easier later on.
  2. Remain flexible and open-minded. Sometimes the first approach to solving a problem isn’t the best one, like desperately trying to fix up pre-dug corridors. In fact, the new solution (such as cracking open an old script with the boys) might be totally different to the way you’d “usually” approach such a problem. It’s a good idea to allow for that when debugging and problem-solving.
  3. Draw stuff! Yes, get out a notepad and pen and start drawing combinations of tiles! Think about how your algorithm will respond to any particular scenario you can think of. I found that visualising the room layout and searching for patterns helped me find the solution much more quickly – and even when it didn’t, it gave me new ways of thinking about the problem and new ideas for improving the algorithm.
Categories
Gamedev Grievances General

One Year of Gamedev Grievances: The Top Five

Just last week I hit a big milestone – one year of blogging my experiences in developing Ambience! It’s been a really exciting, rewarding, and sometimes frustrating journey so far, and I’m sure that’s set to continue. As I reflected last week, it’s amazing to think how far things have come since I started working on Ambience.

Over the past year I’ve also chronicled many of the biggest hurdles I’ve overcome during my gamedev experience. And so, for my one-year bloggiversary, I decided to go down memory lane and pick my personal top five “Gamedev Grievances”.

This was actually a really hard list to compile, simply because there were so many potential contenders for the top spots! But in the end, I finally managed to pick out five grievances I look back on with pride. (Or dread.)

5. Dynamic Terrain (GDG #20)

In Ambience, players have the ability to manipulate weather conditions to dry up rivers, blow away leaves, and open up new passageways and shortcuts. I’m actually kinda proud of how this mechanic opened up so many new gameplay possibilities and made Ambience just that extra bit more interesting to play. That being said, however, it was somewhat of a pain to implement – especially in tandem with my line of sight algorithms (but more on that later.)

4. Would the Right Data Type Please Stand Up? (GDG #9)

Every time I look back on this one, I can’t help but smile wryly (while screaming internally and wishing I could bash my head against a wall). The goal: implementing a new menu system. The problem: activating Ambiences simply wouldn’t work after the new changes. After hunting through my code for a while, I eventually found it by accident: GM:S was treating an integer argument as if it were a string! 

What’s even more interesting is that after I published that post – complete with my rant about dynamic typing in GML – I received a bunch of messages from people telling me about all these other programming languages that also use dynamic typing. (Python! JavaScript!) This led to the unexpected, and very valuable, realisation that I could learn a lot from the broader community of game developers as well as from my own experiences.

3. Sword-Swinging Maths (GDG #12)

As an engineering student, I love it when I get to use maths in my gamedev stuff. One notable example was when I was designing the attack animation for characters with hands. I spent a lot of time (and had a lot of fun!) working out how to make the player’s hand travel along the loop of a polar curve. I also varied the angle of the held weapon as the hand swung along its trajectory to make it look more like a vicious slash.

Not only was this really fun to implement, but I’m still using this fundamental code in the current version of the game as it stands now. (And it also showed that the maths you learn at school and uni can come in handy, after all!)

2. Pixel Art By A Non-Pixel Artist (GDG #14)

If there’s one thing I keep saying on this blog, it’s: I Am Not A Pixel Artist!” Needless to say, as a solo indie game developer, pixel art eventually becomes a necessity to get a game up and running. So when I decided it was time to make some new mugshots to suit my new character designs, I decided to document the results and evaluate how I, a non-pixel artist, fared doing my most dreaded past time: pixel art.

The resultant write-up became my most viewed post of all time.

I’m not quite sure why this post became so popular. Most likely, people just wanted to see how I went – or more realistically, how badly I did. The funny thing, though, is that I don’t think I did that bad a job. Even the above screenshot of Zephyr’s mugshot, which I’ve since improved quite a bit, didn’t turn out as horrendously as I thought it might.

In any case, the readers seemed happy, and I was happy. Win-win.

Now, before I announce the number one gamedev grievance of the past year, I also thought I’d draw some attention to another very popular post:

Bonus: “I’m an Indie Game Developer, and I’m Proud”

Though not a Gamedev Grievance, I thought this post also deserved to be on my list of highlights. At first I always found it a bit weird telling people that I’m an indie game developer, but over time I’ve come more to terms with that idea and am more comfortable talking about it. You can read more about it in the original post (link above).

Now, without further ado, the award for number one Gamedev Grievance goes to…

1. Clearing the Fog (GDG #20)

Oh, man. This thing practically gave me PTSD – especially when it came to the days and weeks of debugging that followed.

The aim was to design a line of sight algorithm that could reliably deal with non-rectangular rooms in dungeons. I eventually came up with an algorithm that worked by drawing expanding concentric rings around the player, which generally worked okay…

Okay, that is, with the exception of a million bugs and some very strange results that appeared in room after room after procedurally-generated room…

And then, when I implemented dynamic terrain and had to work out a way of integrating it with the line of sight algorithm, things became even messier…

Procedural generation can be both a blessing and a curse. It’s a blessing when it gives the player a huge range of different scenarios to handle, keeping gameplay fresh and exciting (and also making the whole “level design” thing much easier). It’s a curse when it gives the player such strange results that gameplay becomes confusing, frustrating, and at worst unplayable.

As the game developer, the power of proc-gen is in my hands – and with it, a great and terrible responsibility has fallen on my shoulders. That responsibility is, simply put: “Don’t mess up.”

It’s harder than it sounds.

Categories
Ambience Gamedev Grievances

Gamedev Grievances #29: Crafting!

Hey guys! Heading towards final exams at the moment (only two of them, thank goodness) which is why the posts have been fortnightly instead of weekly. I’ll post again in a fortnight’s time and then hopefully get back to weekly posts, or maybe more frequently 🙂

Anyway…

Recently I’ve been thinking about items and what the player can do with them. As of a week ago, the only thing a player could actually do with items was, uh, use them or store them in a hole. Not the most exciting options. Then, midway through the story, I decided to introduce a new character, Sage, who lives in a new area (the West Camp) and lets you, uh… store your items somewhere other than a hole in the ground.

From a game-play perspective, this wasn’t just redundant and a bit of a letdown – this was actually fairly problematic. Just as the player’s getting used to storing their items in the storage hole, they’re suddenly told to use another place instead – which is confusing and ugly. “Wait a minute, do I store items in the storage hole? Or with Sage?”

So storage stayed in the hole. But what to do about the character Sage? I knew I wanted to keep him in the story, so I had to give him some other role. Which led to a new idea…

Weapon Crafting!

This idea came from the fact that often the player ends up collecting a fair few extraneous weapons. Having duplicate weapons in your inventory isn’t very useful in Ambience, since you can only equip a single weapon at a time. So rather than leaving those extra weapons to rot in storage forever, the player now has the option to craft them into something more useful – possibly into weapons which are very hard to find in dungeons. Here’s the process:

  1. Chat to Sage in West Camp.
  2. Choose the weapons you want to craft and confirm it with Sage.
  3. Get a brand new weapon!

Under the Hood

At first I was a little hesitant to take on the idea – not just because it sounded kinda RuneScape-y, but because for a while I wasn’t decided on how I would implement it, programming-wise. In the end, I did it using list data structures, which was perhaps the most intuitive way.

Ambience stores items in your inventory and storage using data structures which GM:S calls “DS Lists”. I simply created a new list for crafting items to go alongside the inventory and storage lists. When the player selects items to craft, they’re removed from the inventory list and stuck in the crafting list. Then, when the items are crafted, a new item is generated from the item IDs in the crafting list. This new item is then dumped into the player’s inventory and the craft list is cleared. The player then gets to enjoy using their brand new crafted weapon 🙂

Some Final Thoughts:

Overall, it was a simpler process to implement than I thought it would be. The biggest bit of work left to do now is to sort out which weapons can  be crafted from what. For the sake of variety, that might entail adding some new weapons to the game, some of which can only be obtained by crafting.

Also, since Ambience doesn’t use any sort of in-game currency system (a deliberate decision on my part), the only things the player has to forgo are the weapons that are being used for crafting, making the process potentially a bit too easily accessible. Another consideration is whether the system will allow the player to generate overpowered weapons too early in the game, but there are a few ways I could deal with that (e.g. by making some craftable weapons only available in later dungeons).

All in all, even though the system may need a bit of tweaking and polishing, I’m quite happy with how it looks at the moment!