Implemented and tested some gameplay-relevant weather effects. I also tweaked the procedural generation algorithm for dungeons – can now generate rooms with central “pools” of water or sand, as seen here.
Finally, I started playing around with video capture to see if I could get some videos made of Ambience gameplay, rather than just silent GIFs. I’ve been working a fair bit on the game’s OST and have been looking to show it off for a while. However video export to Twitter always seems to result in poor quality so here y’all go, you can have this little clip instead… 🙂
A glimpse of the first boss encounter in Ambience. Complete with soundtrack!
With another hectic year of study over and exams done, I’ve finally finished my undergraduate studies in engineering! Which means I’ve also finally got back into the groove of gamedev and have been putting some of the finishing touches on Ambience. (Don’t worry, I definitely haven’t given up on Ambience at all! I’ve just been a lot quieter than usual internet-wise, which I know needs to change – I’m thinking about ways of improving that.)
In redesigning yet another cutscene, I stumbled upon a cool application of numerical methods which I thought I’d share. (For those who aren’t familiar with the term, numerical methods are a way of finding approximate solutions to complex equations which would be really hard to solve exactly.) In my case, I wanted to make a cutscene where the player is viewing a fireball travelling over water, from the perspective of the fireball.
Here, I needed an effect with a water background moving vertically down the screen to represent the water below the fireball. I already had a 32×32 water tile – check. But these water tiles needed to stretch vertically and move faster as they moved towards the bottom of the screen (“closer” to the player). So I made some horizontal “strips” of water tiles and tried scaling them and moving them down the screen. But then I realized something else: the strips of water tiles had to scale and move while also remaining attached to the strips of tiles above and below!
To achieve this, I made a data structure containing a list of y-positions on the screen. These positions would move progressively down the screen, going faster and faster as they went. When the bottom-most position went off the bottom of the screen, it would be placed back at the top. I could then draw each horizontal strip of tiles stretched vertically between two of these vertical points, and it would always remain attached to the strips above and below it. The diagram below shows how this all looks in practice:
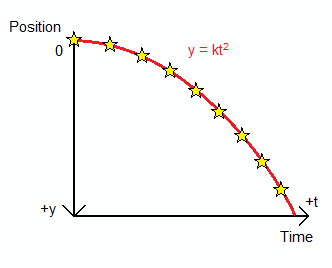
That only left the vertical movement itself. On every frame in-game (once every 1/60 of a second), each point had to move down the screen a bit. If a point was closer to the starting point (the “horizon”), it had to move only a small distance; if it was closer to the bottom of the screen, it had to move a larger distance. So as time progressed, each point would be falling faster and faster. I chose to model this using a parabolic relationship between position (y) and time (t), like in the graph below, which is similar to how things fall under gravity.
Relationship between position (y) and time (t). The stars show the y-value points, and k is just a constant. I’ve drawn the y-axis with larger values downward, since this is how it works in-game.
But there was a problem: since I was working with multiple points, I couldn’t simply use an ever-increasing time variable to work out the position of each point every step. Instead, I had to calculate the next y-position of each point () based only on the current y-position () and the difference in time between each frame (, which in this case was 1/60 s).
Warning: Heavy Maths Ahead!
It turns out I couldn’t do this easily by playing with the exact equation for the parabola, either:
This is where the numerical methods come in! I approximated the change in y using the derivative (“slope”) of the parabola at the current value of y, like this:
Then I rearranged the original formula for the parabola to get rid of that pesky, unknown time variable :
So at every step, I updated the y-position of each point simply by adding to it. (With one exception: for points at the starting point, the slope of the parabola was zero so the point wouldn’t move down at all! Instead I used the exact formula for the parabola to shift the points nicely off the starting line.)
Here’s a GIF of the numerical method in action (the points are shown as red circles):
Hey, nice! The red circles drop from the starting point and accelerate as they move downwards, as expected. And here’s what it looked like when I added the horizontal strips of water background between the points (with some other minor adjustments):
I then made some more adjustments including changing the speed and number of points and fixing that annoying “bobbing” top of the water level. And here’s the final(-ish) result:
(I guess learning all that maths in my engineering degree did come in handy, after all!)
Just as a reminder (to myself, mostly) that I’m still making good progress on Ambience, here’s ten things I got up to over the past month:
#1: Added randomly-generated quests. This turned out okay in the end, and in general it doesn’t do anything too stupid (like giving the player a Surefire Flower in exchange for a Surefire Flower – see below). I’m also still not sure if I should add story-related tasks to the in-game quest list, or if that’d make things too confusing.
#2: Improved the user interface and menu appearance. I wasn’t really happy with the UI in the above picture – to me it seemed a bit empty and disorganized with text just floating around. So I added some background boxes to compartmentalize it a bit and make it a bit more ordered (and nicer to look at – see the GIF a little further below). I also set a limit on the maximum length of the option boxes, so that they didn’t overlap with the info boxes at the right like in the screenshot above.
#3: Added some post-game content. I added a new sidequest where you collect pieces of a mythical whistle, the Skywhistle, for an itinerant piper. This allowed me to add some more dungeons, items, and even a few short bosses.
#4: Added lots of new items. Cloaks, swords, breastplates, potions… and of course, the aforementioned Skywhistle, which emits a piercing shriek when used and shoots quavers as projectiles.
The Skywhistle and improved UI in action.
#5: Added lots of new enemies: snakes, spiders, turtles, humanoid golems… you name it! (Me as I’m typing this: Wait, did I really add turtles to the game? Let’s see… oh, I did! I completely forgot to add them to the new dungeons I made! Oh, well, better do that now…)
#6: Added some new dungeons as well. This is where things became interesting. I started to play around with dungeon restrictions to make the experience more like a roguelike – for example, limiting the number of items the player can take with them into the dungeon, or temporarily reducing the player’s level to 1 for the dungeon. With those changes, Ambience really exhibits a greater range of flavors. The game transitions from a pleasant little dungeon-crawler in the early dungeons to a monstrous game of survival and chance in the post-game.
#7: In my downtime I spent a little while watching some YouTube playthroughs of Shiren the Wanderer and Pokemon Mystery Dungeon, two of my favorite roguelike-related franchises. It’s always interesting and useful to see how other people (especially professional companies) approach the roguelike genre and how they keep gameplay interesting, tell a story, etc.
#8: In the midst of my procrastination, I also watched a couple of scenes from Neon Genesis Evangelion (one of the very few anime series that I actually watch and kinda like). In the end, though, this turned out not to be completely unproductive – I got some excellent inspiration for a cutscene towards the end of the game, which I rewrote to be much darker and more psychological.
#9: Completed mugshots for all the main characters, including several minor characters. I don’t know why, but it always takes me ages to add things like mugshots, sprites, and dialogue for Foss, the scientist who’s studying the Ambiences. In any case, that’s all done now – phew!
#10: Finally, I changed some aspects of the game’s final boss, introducing a new area-of-effect attack and adding some particle effects and rumbling thunder to the introducing cutscene. I don’t really want to spoil too much, but suffice it to say that the boss fight is much more impressive and challenging as a result.
So with another semester of uni over, I’ve finally had some more time to work on Ambience and start applying some of the finishing touches. One of those “touches” is revamping the characters’ mugshots, which I originally made over a year and a half ago (wow, how time flies!) and posted on here.
Since then, though, I’ve realised that the mugshots are okay, but still could be better. Since I’ve had a bit more practice at pixel art in the past 18 months, I decided to redo them once and for all. But this time there’s an added twist: instead of depending too much on copying and pasting features, I decided to draw each character’s mugshot independently and from scratch.
Here’s how they turned out:
The Player
As you can see, I’ve gone for a slightly different, almost “anime”-like style with these new mugshots, and I’ve also made them bigger so that I can draw out more detail in the characters’ faces. The player’s mugshot was an important one, since the player sees it all the time in-game, so it had to look pretty good. Most of the original features and colours remained the same with this one, including the player’s spiky bed-hair. The hair was shaded a little differently to the original and uses highlights a little more carefully.
Vulcan
Again, Vulcan’s mugshot uses the same colours as his original mugshot. The open, smiling mouth was very tricky to pull off, and even now I’m not totally happy with it… (Closed mouths are so much easier to draw!) On the plus side, I think Vulcan’s hair turned out fairly well and nicely reflects his headstrong, fiery personality.
Zephyr
Speaking of hair… Zephyr’s hair was daunting to begin with, but it was actually easier than I thought it would be. I realised that I didn’t have to go into huge detail to bring out the bushy, woolen texture – a few wavy highlights here and there were enough. I also drew Zephyr’s eyes a little differently, not just to make them more feminine but also to give her that permanent, slightly annoyed expression.
Pontus
I actually liked the “furry” texture of Pontus’ hair and beard in his original mugshot (and NPC sprite), so I replicated that here. (In fact, I coloured in Pontus’ beard by picking a 4-colour palette and just scribbling over the beard with each colour in turn until it looked good!) I also made his eyes smaller and his nose bigger compared to other characters to make him seem a bit beefier and less friendly.
Clarissa
Ooh boy, this one was tough. Clarissa’s mugshot has so many unique elements: her eyes, her hair, her lipstick… Making expressions out of that lipsticked mouth was pretty difficult, but I managed to get some inspiration from the original mugshot. I also replicated her dry, slightly frizzy hair texture from the original mugshot, and gave her some eyeliner as well to complete her unique look (even though, well, Clarissa’s not exactly the sort of person who would wear eyeliner to work).
Thanks to her trademark fringe, Clarissa’s face is quite asymmetrical and this meant that I had to pixel in each eye as completely separate features. In the original mugshot, I made the hair over her covered eye partly transparent so you could see the eye underneath, but this time I just made the eye outline a little lighter and kept both her irises the same colour. It gives pretty much the same effect but requires a smaller colour palette, which is easier to work with. After all that work, I think her mugshot turned out pretty well!
I’ve still got to complete mugshots for some minor characters (particularly Foss’ Henchmen), but it still feels like I’ve reached a milestone, and I’m much happier with how the mugshots look in-game.
For some reason, line of sight and fog algorithms have just been an itch I always need to scratch. I’ve lost count of how many times I’ve revised that algorithm (but hopefully I’ve done so for the last time now!)
In particular, over the past week I began to notice that the line of sight would take a little while to update when moving from a corridor to a room, or vice versa. This caused a little bit of lag with each step. It wasn’t intolerable, but still noticeable when playing and so definitely not ideal.
After spending several hours tweaking and fine-tuning the line of sight updating algorithm, I figured out and managed to solve the problem. For some daft reason, I had originally told the game to update every tile on the screen with each step, which was slow and computationally intensive – hence the lag. So I re-designed the system (again!) to do what I should have done in the first place – only change the tiles that had actually changed visibility with that step. And, as expected, it worked! Walking smoothly through a dungeon corridor has never felt so good.
Moral of the story? Do things right the first time (if you can), so you don’t spend hours later down the track trying to fix up bugs from poorly implemented code.
(Incidentally, the function that was chewing up most of my processing time was the function used to find the ID of a tile on a particular layer. Which was unexpected, and a bit annoying…)
I wasn’t really sure what to call this post, since I’ve been working a lot on tidying up Ambience but haven’t really been particularly stuck on one single thing to write a “gamedev grievance” about! So I figured I’d write up a short summary of the many things I got up to this week:
Fixed pathfinding. Well, sort of. I noticed that in large rooms, the game would sometimes lag at the start of a turn if the A* pathfinding algorithm couldn’t find a valid path to the player. One way of fixing this would be to run the A* algorithm branching from both the player and each enemy simultaneously, but this would require rewriting a lot of my code. Instead, I modified the code I already had to make it work a lot faster and more efficiently when finding a path. For example, I changed one of my data structures from a list to a map, which runs much faster in GameMaker: Studio. There’s still a bit of lag sometimes, but only in large dungeons with lots of enemies, and even then it’s nowhere near as bad as it was.
Fixed the battle log. I finally decided to implement turn announcements in the battle log, so the player has a better idea of what happened when (and also to give the game a more rogue-like feel overall). My approach was a bit unconventional – since there are a variety of ways a turn can start in Ambience, I added the announcement for a new turn at the end of the previous turn – which made things a bit tricky. In the end, though, I think I got it working okay.
Modified room and dungeon layout. Now floors are bigger, with more rooms and more enemies – which means more fun!
Improved graphics – including several mugshots and the Cactus Crawler sprite. I’ve been meaning to fix up the latter for quite some time, but again only got around to it now.
A wild Cactus Crawler appeared!
Fixed the line of sight algorithm… again. I implemented the system I’m currently using a while ago, but I’m still having to fine-tune it occasionally. Specifically, when the player activates an Ambience and modifies the map – say by drying up pools of water using the Ambience of Sun – the game unnecessarily modifies some of the “corridor cells” to become “room cells”, giving the player too much line of sight extending into adjacent rooms. The solution: don’t change those cells into room cells. Easy!
The playthrough continues… I’m playing through the game as an ordinary player would to get an authentic idea of the game’s difficulty at each stage of the game. Along the way, I’ve discovered that Ambience is actually fairly challenging – even for me as the developer. At any stage, the player could go from being perfectly fine to on the brink of defeat in as little as one or two turns. I don’t mind the challenge, though. It’s all part of the roguelike nature, after all.
In my recent escapades with developing Ambience, I’ve spent several days (!!) adding over 50 new weapons to the game, each with its own strengths and weaknesses (and quirks). It’s been a big job, but now I get to reap the rewards and finally add them to the game.
Except… how do those items get generated in-game, anyway?
This was yet another system that I had implemented very early on and had all but forgotten about. So I decided to crack open my rusty old system to see if I could improve the way items were generated.
The Original System
When a dungeon is generated in Ambience, all the possible items for that dungeon are loaded into a grid data structure, along with their respective probabilities of appearance and the dungeon floors they should appear on. Then, an “evaluation” script looks at the grid and spits out the ID number of the item to be generated. This general idea remained unchanged, but what I did change was the way the evaluation system worked.
The original script used a long and rather dodgy iterative method. It would scroll through each item in the grid, and for each it would generate a random number from 0 to 1000 and compare this with the set probability of that item appearing. If the random number was less than the probability, that item was selected and the loop was terminated. Of course, this system had the potential to go on indefinitely without ever selecting an item, so a maximum number of trials (something like 2,000) was set to prevent this.
Even so, having to generate a random number for every item checked, as well as having to loop through the grid multiple times to find an item at all, made this system rather inefficient. In addition, if the probabilities of items was less than (or more than) 1000, some items would appear more or less often than specified. In other words, the system was just plain dodgy. So, off to work I went…
A Better Method
Getting rid of the iterations was top priority right from the start. I wanted to build a system that required the least computation time – that meant generating a single random number and scrolling through the data structure only once, while making sure that a valid item was produced every time. Here’s the solution I came up with:
The first thing I did was sum all the probabilities to give a basis against which I could compare the relative probabilities of each item. (Much better than having to manually make sure that all the probability values added up to 1000!)
I then selected a random number between zero and the probability total. That random number corresponded to the item I was going to choose.
To find that item, I went through each item in the grid in turn. Each item’s probability was added to a cumulative sum variable keeping track of the cumulative sum of probability values. Then, I checked: was the cumulative sum, including the latest item, bigger than the random number I chose? If so, then the latest item was the one to generate.
Here’s a diagram which probably explains everything a lot more easily than the wall of text above:
But wait! What about items on different floors?
Ohhhh, that’s right… we also have to check if the item we’re making can actually appear on that floor before generating it!
There are two ways I found to approach this. One was to choose a random number at the start, then go through the grid and check if the chosen item can be made on that floor before “approving” it. If that item can’t be generated on this floor (an “invalid item”, so to speak), choose another random item from those remaining and keep going.
Even though this method only needed to go through the grid once, the contribution of these “invalid items” to the sum of probability values was problematic. Since new items were only chosen from the list of remaining possibilities, this meant that items earlier on in the list were more likely to be skipped over in the end result – thus skewing the true probabilities. Even worse, the final item in the list could itself be an invalid item for that floor, which when chosen would result in no valid item being generated!
In the alternative method, which I ended up using, the script skimmed through the grid once at the very start to find any invalid items and set their probability values to zero – thus effectively removing them from the grid. Only then did the script choose a random number and go through the grid a second time to find the corresponding item. Although this meant that the grid had to be checked twice, it guaranteed that all items and probability values were valid every time. In any case, this was much better than checking the grid indefinitely in an iterative method!
Here’s another nice diagram summarizing the above:
The Learning Curve
For me, the biggest takeaway from this was to make systems simple, but not too simple. It’s nice to have a clean, functional item generation system that doesn’t rely on iteration – but at the same time, my original aim to “go through the grid only once” turned out to create more problems than it solved. The final script, while perhaps not as efficient as I had originally hoped, was still good enough to get the job done.
A long-standing “feature” of Ambience has been the somewhat embarrassing fact that, well… none of the characters seem to have arms.
Some armless action from an earlier build of Ambience.
This was primarily because I’ve never been great at pixel art, so approaching this from a purely artistic perspective would have made for a very big and very painful job. First, I’d have to making sprites for every character walking and attacking in eight directions – arms included. Then I’d have to give the player the ability to hold and swing weapons. The thought of making a set of animated sprites for every weapon in the game was terrifying, to say the least.
Mathematically, however, this isn’t too difficult to pull off. I’d already used some clever maths to animate a hand swinging a weapon, as well as a generic creature attack. But I hadn’t yet done the same for a complete arm – mostly due to laziness.
But evenrually, I decided that enough was enough. I was tired of trying to convince myself of the normality of inexplicable floating hands. So I rolled up my sleeves and got to work making some arms for my characters.
Arms for Programmers
I designed my characters’ arms to be relatively simple. They consisted of two “nodes”, a shoulder and a hand – basically two points which the arm had to go through. My “floating hands” engine already gave me the framework for the hand node – how it moved when rotating or swinging a weapon, and so on – so I duplicated this for the shoulder node and tweaked it slightly.
Now each character had its own four nodes – two shoulder nodes and two hand nodes which moved with each character. So far, so good.
Then came the tricky part. I made up some quick generic arm sprites which were about the right length and shape, and – using a lot of trial and error – worked out how to rotate each arm sprite to always pass through the hand and shoulder nodes. The system I ended up with used the shoulder node as an immobile “pivot”, and rotated the arm sprite so that it always pointed from shoulder to hand.
It sounds simple (and it is, actually), but it was a bit tricky to implement in practice. One of the difficulties I faced was trying to get rid of unsightly, “sticking-out” pixels caused by very slight rotation of the arms in the resting position. (Rather than try and fix this using code, I ended up modifying the arm sprites slightly so slight rotation wouldn’t cause those sticking-out pixels.)
Note that sticking-out pixel on the player’s left arm.
While testing things out, I placed the player in a test room and moved his arms around in almost every imaginable way, just to check that everything looked okay. Which it did, in the end:
I’ve highlighted the hand and shoulder nodes in this one so you can see how this system works.
Considering that this was all done using code rather than actual sprites, I was fairly happy with the end result. Of course, I could have made it look much better by making some actual sprites for each arm, but as I mentioned before, that was a bit beyond my abilities. At least it’s better than having to put up with floating hands!
A long time ago, on a computer far far away… there once was a development build of Ambience which introduced a neat swirling light pattern in the prison-based dungeons.
Throwback to the good old days… September 2016, to be exact. Wow, this really is old.
More recently, I decided that the light swirl was in need of some updating. It hadn’t actually changed much since the GIF above (except I might have changed the colour a bit – I’m not exactly sure). In particular, I didn’t like seeing the sharp edges of the light swirl and decided to make a smoother fade effect at the edges. How to do this, you ask?
Enter the primitives…
I’ve never liked primitives much. Not because they’re actually not useful – they really are – but mostly because I’ve always seen them as more of a 3D thing rather than a 2D thing. It’s kinda like that obnoxious relative you always hear about at family gatherings but never really meet, and when the time comes to meet them, you’re not super keen on it. If that makes sense…
Anyway, here’s my own simplistic understanding. A primitive is kinda like a basic shape (say a point, line, polygon, 3D blob…) which you define by setting the vertices/corners and letting the game engine draw it. Say you want to draw, I dunno, a triangle. No problem! Just set three vertex positions and tell the game to fill it in. How about a segment (like a pie slice) for our swirling light? Also easy-peasy! Just draw a bunch of really thin triangles squashed up next to each other, and if they’re thin enough, no-one will notice that your pie slice is actually kinda blocky at the ends.
Fading the edges
In the GIF above, I just made a single segment primitive, drew it and rotated it around and around to make the swirling light effect. But to fade out the edges, I couldn’t just rely on a single primitive. Instead, I needed to add some more primitives (think: thin pie slices) with gradually increasing opacities at the edges to surround the bright “main” segment.
My first thought was, “Why don’t I make twenty separate primitives for the segment and just fade out the ones at the ends?” But I figured that would be inefficient. I only needed separate primitives for the edges where the opacity was changing, not for the middle segment which had constant opacity. So, I had a plan: First draw the primitives at the leading edge fading in, then a single primitive for the middle segment, and then finally some primitives on the trailing edge fading out. Easy, right?
Well… sort of. There’s a price to pay for efficiency, it turns out. I wanted to make my light swirl code as elegant and efficient as possible, so I thought up a basic algorithm to do the job using a single for-loop and minimal different cases:
Set the initial opacity to zero.
Check where we are on the light swirl segment. If we’re near the leading edge, increase the opacity a bit. If we’re near the trailing edge, decrease it a bit. If we’re in the middle, don’t do anything.
Check if the opacity’s changed. If it hasn’t, then fine – just add another vertex to the same primitive (this keeps drawing the middle segment as a single primitive).
If the opacity has changed, then we stop drawing the primitive we were drawing and start drawing a new one with a different opacity.
If the opacity’s about to go below zero, then don’t draw any more primitives. We’re done! (The limits of the for-loop take care of this for us.)
The outtakes…
Because stuff always messes up when you’re doing these things.
The first form of the algorithm I tried drew the light swirl perfectly – with the exception of a single segment just before the trailing edge, which it refused to draw at all. You can see this pretty clearly in the screenie below:
Note that the light swirl (centered on the player here for debugging purposes) is rotating counter-clockwise – so the “leading edge” here is below the player and the “trailing edge” is to the player’s left.
Even when I changed the number of segments, the angle of each segment, and the number of fade in/out segments, the same thing happened. The segment two positions before the start of the fading-out segments simply refused to be drawn.
Since I had set the peak opacity to be 1 (that is, the middle segment was completely opaque), I couldn’t really see clearly what was going on. So I halved the peak opacity and had another look at the leading and trailing segments.
Aha! So while the leading edge segments are drawn normally, the two visible trailing edge segments are drawn with these weird gradients! Something was going on with the trailing edge segments overall. I’m not sure exactly what it was in the end, but eventually I gave up trying to salvage my code and just re-wrote it following the algorithm above. And it worked!
In this case, the arc draws out a 120-degree segment with 12 segments (making it nice and blocky), including 1 leading-edge and 1 trailing-edge segment.
Finally, I made the light swirl sit at a random corner of the view and draw the arc from there, so that the arc would “flash” periodically across the player’s field of view, as per the GIF at the top. (I also made the colour a bit “redder” compared to the top GIF.)
This is how it turned out in the end with 30 segments. It looks a tad choppy here (you can see the individual segments kinda clearly), but that’s just the GIF recording software – it’s much smoother in-game when running at 60 fps. I could make it draw more segments for an even smoother fade, but figured it probably wasn’t worth it.
Looks good!
The Learning Curve
There’s always lessons to be learned from solving these kinds of problems, so here they are:
As I mentioned above, in-game efficiency comes at a cost – which is usually time spent actually implementing the system (and tearing your hair out trying to squash those bugs). Generally, I’ve found that the more sophisticated and/or efficient your algorithm is, the longer it takes to make it work. But when it does work, it’s worth it.
This might be a no-brainer to some, but I find it helpful to break systems down into simpler ones that are easier to deal with when trying to identify and fix problems. In this case, it would have been really hard to fix the problems I had, if I had kept the swirling light flashing at full speed in the corner of the room. Instead, I made the light smaller, rotated it slower, centered it on the player, made it blocky by changing the number of segments, and adjusted the peak opacity and total angle swept out as needed until I (finally) solved the problem. Whatever it takes, I guess.
It’s been a verrrrrry long time since I’ve posted here… but I’ve made it through another semester of uni, got back to programming and things are really starting to look good!
Even though it’s been quite a while since an update here on this blog, I’ve been working on a ton of stuff Ambience-wise. Here’s a quick overview:
Proper text and storyline!
One of the things I’ve been busying myself with lately is doing some proper storytelling. Initially I shovelled a whole heap of placeholder text into the game just to get the basic cutscenes working properly (see below), but now I’m replacing it all with proper text.
Placeholder text lol
It’s amazing how much of a difference that makes. Now when I playtest, the story and the characters feel so much more alive, and even the gameplay feels smoother and more polished. In other words, it feels much more like I’m actually playing a finished game rather than searching some crappy application for bugs. I dunno. It’s exciting to see how two years of work on Ambience is finally starting to pay off.
Pathfinding that actually works!
Yeah, I’ve been meaning to fix this one up for quite a while now. The original pathfinding algorithm I implemented in Ambience wasn’t very intelligent at all – it basically involved enemies either wandering around randomly, or walking in the player’s general direction and hoping it didn’t run into a wall. Which was fine, when it worked. (Which was not very often.)
But it was a start, and, well, the algorithm stayed. For a year and a half.
But now things have changed, as I’ve brought out the big guns with a brand new A* pathfinding algorithm. And, oh boy, does it work. I even had to tweak the first dungeon quite significantly since the (formerly daft) Henchmen became so good at finding the player that the whole dungeon became way too hard.
I added a sepia shader for showing a flashback from an earlier part of the game. And what’s more, I also got the game to display multiple shaders at once. Yeah, that was a proud moment.
Sepia… and swirls.
New Guardians!
I also finally upgraded the sprites for all four Guardians, which I think turned out quite well – at least, better than the previous sprites, I’d say. On the topic of sprites, I also changed Zephyr’s outfit from a full-length dress to a simple top and skirt, made her outfit a little brighter and her hair a little darker.
New music!
I’ve made some tracks for the final boss of the main story – two, actually, depending on a decision that you make earlier in the game. I also managed to put together a fitting encounter theme for Foss – again, something I’ve been putting off doing and have finally done.
Post-game content!
I’ve toyed with the idea of putting in some post-game content for a while, and now I’ve decided to take the plunge and do it. The main emphasis will be on exploring some challenging dungeons, true rogue-like style, as well as liberating Foss’s few remaining prisons (if the player’s left any) and taking on Foss one last time. I might also expand the Vulcan-Zephyr subplot a bit here as well, but we’ll see.
So, what’s next?
The plan is to finish fleshing out the story, add post-game content, and – finally! – start thinking seriously about release. I also need to stop putting off making blog posts about my progress! It’s easy to think I’ve done very little work, when in reality I’ve actually done a lot and I haven’t really paid too much attention to how much I’ve done. For now, I’ll make sure to post semi-regularly (at least once a week), and especially when I’ve got something new and exciting to show.
For now, though, merry Christmas and I’ll be back soon!


 ) based only on the current y-position (
 ) and the difference in time between each frame (
 , which in this case was 1/60 s).


 :
:

 to it. (With one exception: for points at the starting point, the slope of the parabola was zero so the point wouldn’t move down at all! Instead I used the exact formula for the parabola to shift the points nicely off the starting line.)